Showing posts with label paper craft. Show all posts

Thursday, October 13, 2011

November craftLAB: Altered Art Papercrafts with Nicole Stevens!

Join us for a FREE Altered Art Papercrafts Workshop at craftLAB on Sunday, November 6, 2011 from noon-3pm at The Lunch Studio!

Nicole Stevens of Curious Goods will be teaching us basic techniques that can be used to make greeting cards, ATCs (Artist Trading Cards), and/or inchies.

From Left to Right: ATCs, Inchies, Greeting Card
(Photo Credit: Nicole Stevens)

We will have general supplies available, but feel free to bring old magazines, scrapbook paper, markers, stamps or any other specific papercrafting supplies you want to use!

This is going to be a great craftLAB for children, so feel free to bring your kids, your nieces and nephews, your grandkids or the neighbor's kids!

Tuesday, January 4, 2011

January 2011 craftLAB Recap: Paper Globe Ornaments

Thank you so much to everyone who came out for craftLAB on Sunday! 

We had so much fun making paper globe ornaments out of old holiday cards!

Even babies love crafting!

So many happy crafty smiles!

Jeanette loves her paper globe ornament! 

Sue came to craftLAB to learn how to make paper globe ornaments to take the project back to her church...we love when our ideas get out into the community!

Maureen was so excited about the project that she made two ornaments!

Allie put her paper globe on a knitting needle and plans to make paper globe flower bouquets and topiaries.  Special thanks to Nicole for the awesome bouquet idea!

Stephanie, Leo and Lisa were experts by the end of the workshop!

For more photos, visit our craftLAB: january 2011 Flickr Set.

We hope to see you at craftLAB in February for the first Craft Supply Swap of 2011!

Tuesday, November 9, 2010

craftLAB Recap: Paper Circle Garlands

Posted by Crystal

Thanks to everyone who came to craftLAB on Sunday!  The paper circle garlands were so fun and easy to make!  It was the perfect craft project for kids and adults.  :)

Shannon, Jessica and Michelle (l-r) thoroughly enjoyed picking color-coordinating papers for their garlands.

Sophia, Ophelia and Lumena (l-r) used the paper punches to make small, medium and large circles.

Look at Dan's neat piles of circles...this man is one organized crafter!

Jessica's garland looked so great just sitting on the table as she added more circles!

Jessica was the first one done and she loved her garland!

Santana (l) and Gabi (r) made awesome garlands!  Special thanks to their lovely and crafty mom Jackie (center) who actually drove back home after arriving to get paper to donate to the workshop!

Mary (l) made a specialized holiday garland with shapes she cut out at home!  April (l) and her "little sis" Madison (center) created gorgeous pink and yellow garlands.

Michelle (l) shows off her garland AND her cast! Shannon (r) always look so tough...she's an honorary Flintstone!

Dan, Lumena and Ophelia (l-r) are all smiles when it comes to their garlands!

Join us for craftLAB on Sunday, December 5 from noon-3pm at The Lunch Studio.  We will be learning how to melt old, broken crayons into brand new crayons in a variety of holiday shapes!  Bring your old crayons to add to the melting pots!

Don't forget to join us at the Flint Handmade Holiday Craft Market on Saturday, November 27 from 10am-6pm at the Rowe Building!  The first 25 shoppers will receive a goodie bag filled with tons of treats...including a ornament-shaped crayon from our craftLAB test batch!

Tuesday, October 26, 2010

CRAFT TUTORIAL: Paper Circle Garlands

Posted by Crystal

Well, I have been asked to post more craft tutorials, so here is one especially for you, Tanya!  :)

I fell in love with these circle garlands at the 2010 DIY Street Fair.  I saw them hanging vertically like beads in a doorway in the booth by JuliBuli74


You could hang them vertically or swag them or make a mobile!  I think the garlands above were made with fabric circles, but I am going to show you how to make them with paper circles.

Paper Circle Garlands

Materials/Tools:
1) Paper of Various Colors/Prints (e.g. scrapbook paper, catalogs/magazines, junk mail, etc.)
2) Circle Punches (one large, one small)
3) Glue Stick
4) Twine (or string or yarn, etc.)

Step 1: Gather your materials.  Get creative with the paper you choose!  You could also use old photos, calendars, etc.

Step 2: Punch out lots of large and small circles.  The closer you plan to place the circles next to each other on the twine, the more you will need.  You could also use other punch shapes like scalloped circles.  Or, if you don't have punches, you can print/trace shapes onto the back of your paper and just cut them out with scissors.

Step 3: Apply glue to the entire back side of one of your circles.  I like to use a junk mail catalog underneath the circle, so I don't get glue all over my workspace.  Place the twine across the glue on the circle and then sandwich another circle back-to-back on top.
 
Step 4: Vary the sizes of your circle for more interest as you work your way down the twine. 

Hint: If you are doing a repeating color pattern as shown above (yellow/blue/green/yellow/blue/green), make sure you glue the same color circles to each other, so that when the twine twists, you will have the same pattern regardless of which side of the circle is visible.

Step 5: Hang your garland!  They make great party or holiday decorations!  I also think they would look awesome in a kid's room or craftroom.  :)

If YOU want to make a paper circle garland, join us at craftLAB on Sunday, November 7, 2010 from noon-3pm at The Lunch Studio

We will have all of the supplies available, but feel free to bring your own if you have special paper, punches, glue or twine that you want to use.  :)

Tuesday, June 8, 2010

CRAFT TUTORIAL: Handsewn Button Mini-Cards

Posted by Crystal

Amy needed small cards to include with her Made With Luv etsy sales.  Always a good idea to thank the customer!  She saw the thank you cards I made for Michelle and wanted some of her own in a smaller version.

So, using the leftover card pieces I had from cutting Michelle's cards to fit the envelopes, I whipped up some easy mini-cards!  And, now you can, too!

Handsewn Button Mini-Cards

Materials/Tools:

1) Small Blank Cards (or cardstock to make cards)
2) Stamp (with whatever lettering you want: thank you, happy birthday, etc.)
3) Ink Pad
4) Assorted Buttons
5) Assorted Thread
6) Packaging Materials (clear bag, glass bottle, ribbon, etc.)

 Step 1: Stamp your mini-cards toward the left side of the card.  Clear stamps work great for this since you can see exactly where you are stamping.

 Step 2: Choose which buttons you want to place on the cards.  Larger buttons look great by themselves and smaller buttons look good paired up.


 Step 3: Choose which thread you want to use to sew the buttons to the cards.  Feel free to choose a variety of different colors.


 Step 4: Sew the buttons to the cards.  If your buttons have 4 holes, an X stitch looks awesome.

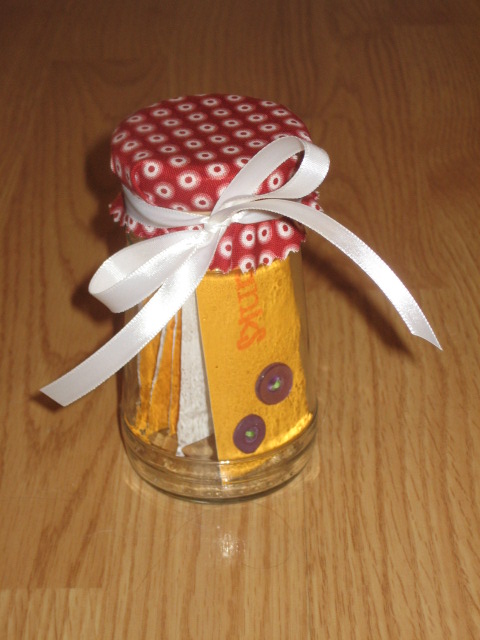
Step 5: Package the cards in a glass jar or other cute packaging.  Since these cards are being included with etsy purchases, envelopes are not really necessary, but you could make your own small envelopes using a template.

If you make these cards (or envelopes), be sure to email pictures to us at flinthandmade@hotmail.com.

Thursday, June 3, 2010

CRAFT TUTORIAL: Photo Corner Cards

Posted by Crystal

Ok, here's how it all went down: 

Michelle (who you may know as the FH Director of Technology and the mastermind behind Aisle 3) needed thank you cards to give to friends and family who had recently helped her fix up her yard and garage. 

I needed motivation to work on a new craft project...as well as a summer bag/purse to carry all my junk.

So, we made a trade: Michelle gave me motivation and I gave her the cards I made with said motivation.  And, soon, she's gonna give me a sweet upcycled bag...of which I will take lots of pics to post here.  ;)

Since we got a great giving mood going on, we're gonna give YOU something now, too!  You get a Flint Handmade Craft Tutorial!!!  We hope to make and post lots of tutorials on our blog and website.

Today's tutorial is on Photo Corner Cards.  These are the actual cards I made for Michelle.  We hope you enjoy!

Photo Corner Cards

Materials/Tools:
1) Small Images (found in catalogs, magazines, junk mail, packaging, old greeting cards, etc.)
2) Cardstock (only needed if your images are printed on thin paper)
3) Gluestick (only needed if your images are printed on thin paper)
4) Paper Cutter (or scissors)
5) Photo Corners (available in the scrapbooking department of craft stores)
6) Stamp (with whatever lettering you want: thank you, happy birthday, etc.)
7) Ink Pad
8) Cards (or cardstock to make cards)
9) Envelopes
10) Packaging Materials (clear bag, ribbon, etc.)

Step 1: If your images are printed on thin paper, glue them to cardstock to make them a little thicker.  This will help them stay neat and flat in the photo corners.  If your images are already printed on cardstock, skip ahead to Step 2.

Step 2: Using a paper cutter (or scissors), cut your images out.  Cut just inside the line of the image for the cleanest look.

Step 3: Place the photo corners on the edges of your image and adhere the corners (with the image inside) to the card.

Step 4: Stamp your lettering underneath the image and include an envelope with each card.

Step 5: Package your cards.  You can place them in a clear bag or wrap them with ribbon or create your own cute packaging!

If this tutorial inspires you to make your own Photo Corner Cards, email us at flinthandmade@hotmail.com.  We would love to see and post photos of your cards on our blog!